Tuesday, 8 December 2015

Dadsworkshop Part 4 half a car the Cowl Part 2

Part 3 Half a car (lotus 7 Build) The Cowl Part 2

The top of the cowl is made in 3 parts the top, left side , right side. The top is flexi 6mm MDF glued and pined, as they were small i pre drilled and put a drop of crazy glue on the pin and taped it in to place. This held ok with some clamps.the sides are done the same way.


this is what the side view looks like 


there will be an over hang that will need to filled and sanded. 


More pics 

Clamping Pics (keep scrolling I am not done yet)


(top) it is taking shape 
Bottom this was filled with a lot of filler and then loads of sanding by hand what i would have given 
for a DA sander at this point 


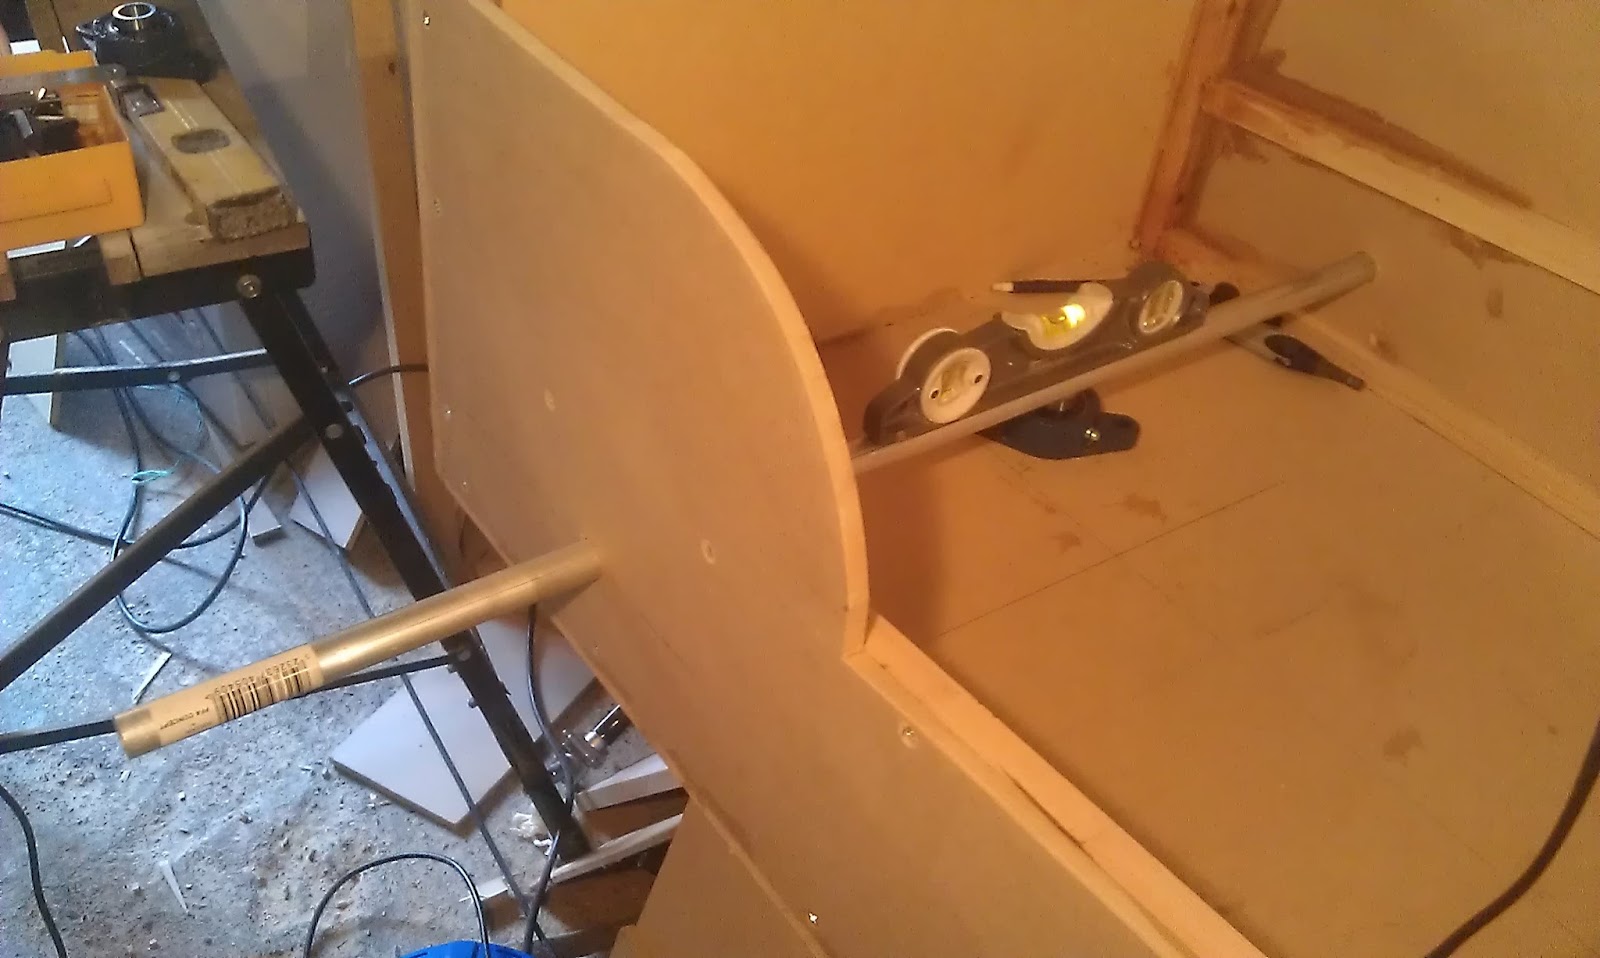
Below i used a steel bar to check the profile of the back to the front of the tub


this gave me a good line for the bonnet later on 


this has taken 2 or 3 weeks of messing around to get right and sanded smooth. at this time i was still playing round with using fiber glass and making plugs and looking at making reinforced fiberglass parts later on in the project i get to this after a lot of research after never doing this before

if you need more information or help i am happy to help any one that would like to make one its not hard i promise

Dad

Tuesday, 1 December 2015

Dadsworkshop Part 3 half a car the Cowl

Part 3 Half a car (lotus 7 Build) The Cowl Part 1

Getting started with the cowl, this was a bit of a mission to start with getting the dimension right
after a bit of searching around the net i managed to get some dimensions to get an ish shape and had to make some alterations to give a bit more room for legs


so after cutting the template out i managed to get a template that worked with the size of the tub


below, i cut the base to i had the start of the bottom of the cowl this will then be used to mark up the depth

once mocking up the template on the tub and making shore the lines of the tub looked right


it was time to cut the cowl using a jugsaw and a bit of sanding by hand :( what i should have done is to make a template and used a router and a pattern bit so i could have made a set of them because later on i will have to make another one, i should have done this with most of the parts but this was 3 years a go, hindsight 


so after cutting sanding, i cut an angle on some soft wood and screwed and glud the blocks in place
the back (below) was a pain to get the height right it needed a shallow slope so it would match the bonnet if i remeber this is a 3 inch high at the high point and i had to sant it to the right shape in place. this part was sanded 3 or 4 more times to get the right shape as I went.


after adding a batton at the back with yet again more screws and glue i had the start of a cowl

Next Post will be about the Cowl part 2 as this was a long thing

Dad

A Dads Work shop / Getting started part 2


Part 2 Reinforcing the tub of the half a car (lotus 7)

reinforcing the tub is a must as MDF is not the greatest for putting screws in to the end grain, putting screws in to the end or side grain will split it and being 9mm thick is not ideal. using a 18mm square batoning around the edges helps using glue and screws about every 4 inches, belt and braces this has held well with holding the 2 boys and me on my own.

using car body filler for the gaps also helps reinforce the joints as it is epoxy bases. i have used steel bracketing on the joint from the cockpit to the engine bay to reinforce this joint. looking back i would cut the angel in the table saw and glue screw and filler it should be as strong


the back is reinforced the same way is the more or less using 2 part epoxy and screws
the back axle holes are drilled to 20mm before fitting to the tub as this will align the holes in the same place both sides, this worked ok but later on had to go to 22mm as this gave a bit of wiggle room

this gives a better view of the tub, its very strong and only really supported by the cawl in top with 2 dowels and 4 screws. this later on i will show how i have had to change this as when i started my son was 7 and now he is 11 so he doesn't fit it now but the 2 smalls fit

till my next blog get out there and make something

Dad 

Sunday, 15 November 2015

A Dads Work shop / Getting started part1

It has been some time hasn't it, i want to re start with a build and to detail it as much as i can for any one who want to build a Half Scale Caterham.

so here we go, it all started a long time ago when i i got the first Electric Rid on and after that looking at the different ride on for kids and after looking at the toy landers they were a bit out if my price rang to building one over 6 months seemed a good idea at the time as i found out it was a bit longer than that.

6 months in R and D
2 months getting all the Parts
more research on some of the techniques i would need
then the build started with a trip to the local B&Q for MDF so with two 8/4 sheets of 9mm MDF i started

i found the dimensions with a google search and spent some time halving every thing.
this is where i found the start of the plans lotus7register and found some more plans dotted around the net. with loads of dimensions and heights for thing, there was a lot of guess work involved


the 1st stage of the build was getting the tub made


I had Help with this part, the Bottom is one 5 by 2.5 foot section of 9mm MDF


here is one of the pics i found cannot remember were i found it but is on pinterest now there is a lot of information on this than can be used to build the chassis

i will be adding more photos and information soon if you need any information you can drop a comment and ill try to help

:) A Dad

Wednesday, 3 April 2013

Update

Hi its been a long time, i have been updating my web site at the moment so have not had time to blog, saying that i seem to spend all my time in the man cave. once i have updated the web page i will add some pics to the blog

i will try and get a vid up soon

Wednesday, 23 January 2013

Dadsworkshop update

To See more information about the Project please see
Dads work shop comming soorn
i have posted more Photos here there is a bit more information of work done

Saturday, 20 October 2012

Getting started


Once I have go the plans done I need to work out steering and drive train. 
Looking around at the likes of toylander and other ride ones, I have gone for a mobility scooter


this is about a meter in length and about 16 inches wide this is small but will push/pull 19 stone at about 6 MPH. so after a strip down I managed to get the electronics and the speed controller out of it and a small back trans axil they I will go in to more depth on modifying this at a later date.

This is the Trans axle and the speed controller that has been removed and cleaned up and

Here is the part of the steering, from a go kart